Introduction
This User Guide proposes to describe the way the application should be used and all the functionalities that are available within the application.
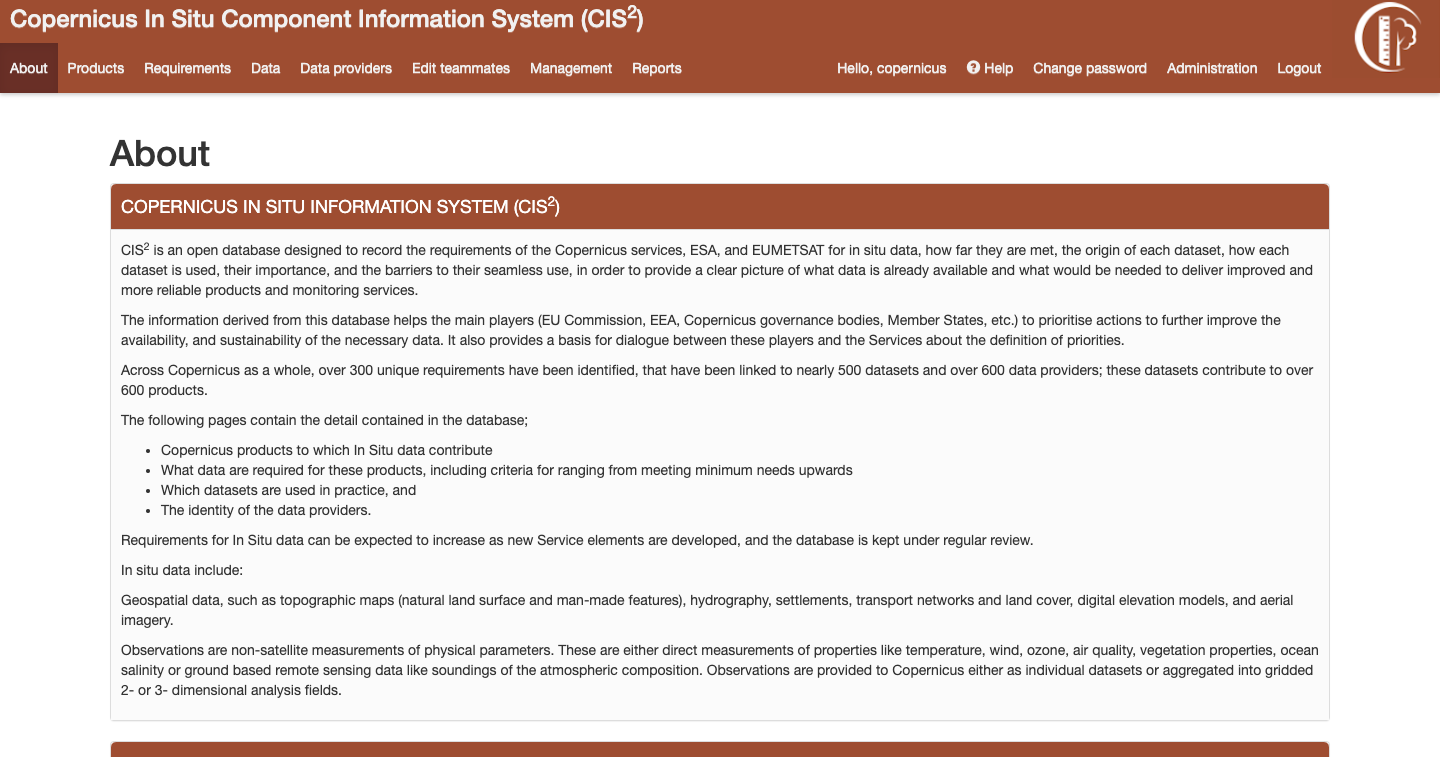
Figure 1 Main application page
The first page, available at https://cis2.eea.europa.eu/, is the HomePage presented in Figure 1. The navigation menu is available on the top of the page and it can be used to navigate to the listing pages of Products, Requirements, Data, Data Providers, to make changes to the user’s account or to consult an online help page.
Database objects
The application holds the following main objects: Products, Requirements, Data, Data Provider. Those objects can have multiple relations between one another. Besides those objects, there are many picklists tables which hold various values to be used when defining an object.
Products
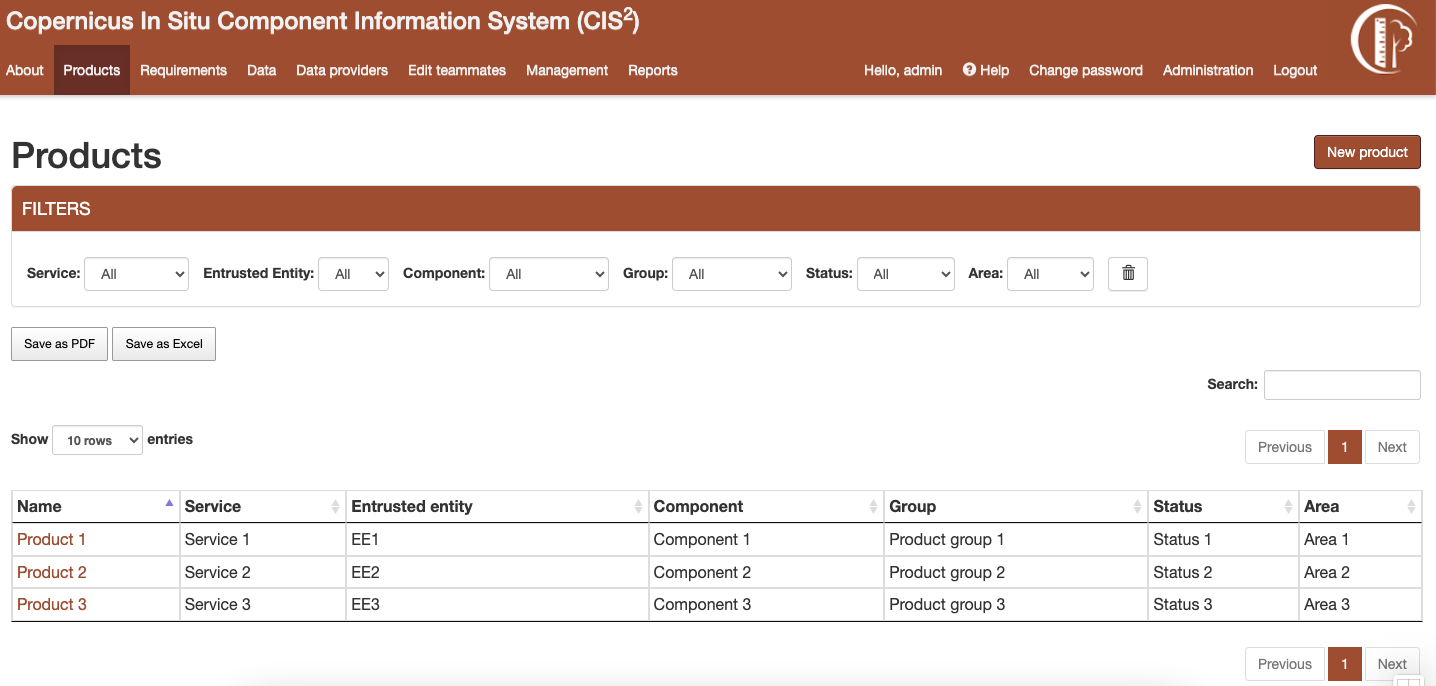
Figure 2 Products listing page
Listing products
Products listing page can be accessed from the link in the navigation bar. The listing can be filtered using the dropdown options or by searching the products by their names. The filtered table can be exported then as a PDF or Excel document.
Creating new products
A new product can be created by clicking the button “New product” from the listing page. The form must be completed respecting the validation constraints. A product can be added only by an user with administration rights.
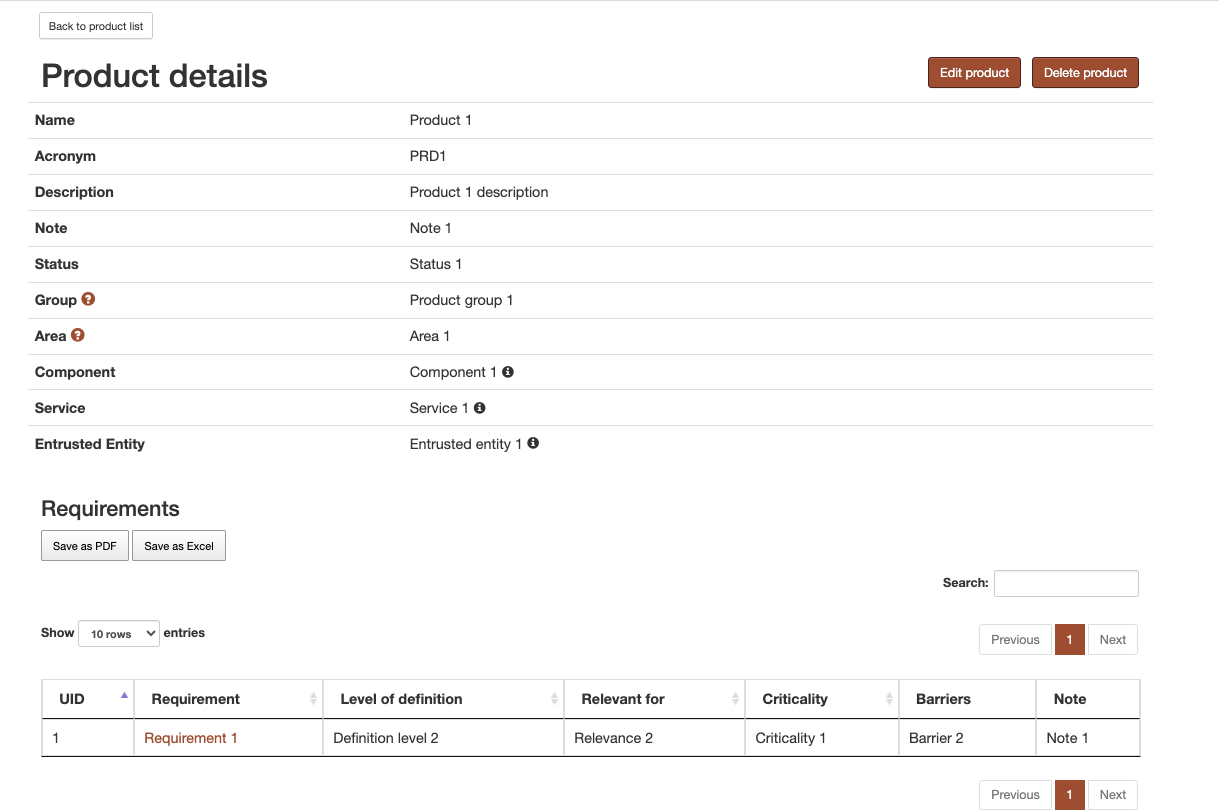
Figure 3 A product’s detail page
Detail page of a product
A product’s detail page can be accessed by clicking on the product’s name in the listing table. All information concerning the product is displayed on this page. The table at the bottom of the page presents the requirements that product has a relation with. By clicking on the requirement name, the requirement detail page can be seen. This table can be filtered by searching the requirement’s name. It can also be exported as either PDF or Excel document.
Updating an existing product
A product can be edited by clicking on the “Edit Product” button from a product’s detail page. The form must again respect all validation constraints. A product can be updated only by an user with administration rights.
Deleting a product
A product can be deleted by clicking on the “Delete Product” button from a product’s detail page. Another button must be clicked then to accept this change. A product can be deleted only by an user with administration rights.
Requirement
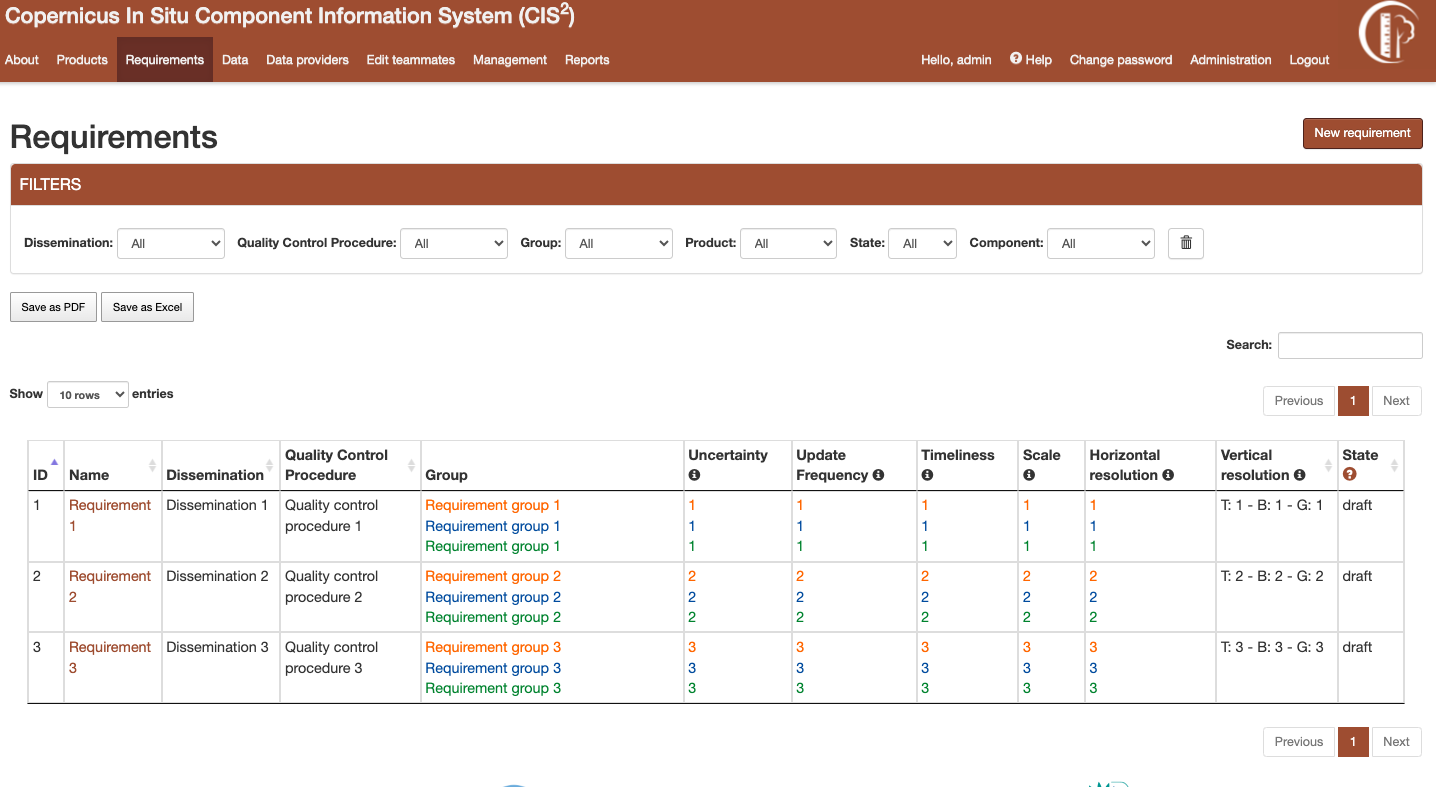
Figure 4 Requirements listing page
Listing requirements
Requirements listing page can be accessed from the link in the navigation bar. The listing can be filtered using the dropdown options or by searching the requirements by their names. The filtered table can be exported then as a PDF or Excel document. For metrics columns a legend explaining the values meaning can be accessed by hovering over the information button.
Creating new requirements
A new requirement can be created by clicking the button “New requirement” from the listing page. The form must be completed respecting the validation constraints. For requirement, a special validation is implemented. There must be no duplicated requirement. This means that in order to create a new requirement, it must have at least one field(except for its name) which is different from another requirement already in the database.
Cloning a requirement
The clone option can be used if a new requirement to be created is very similar to one existing already in the application. The cloning form can be accessed by going to the detail page of the similar requirement and clicking on the Clone button. The form will be completed with data from the similar requirement. However, in order to save the new requirement, at least one field must be changed (except the name field).
Detail page of a requirement
A requirement’ s detail page can be accessed by clicking on the requirement’s name in the listing table. All information concerning the requirement is displayed on this page. The metrics information is explained when hovering over the values. There are two tables at the bottom of the page. Both tables can be filtered by name and then exported as PDF or as Excel.
The first table concerns the relation with products. All products with which the requirement has a relation with are listed in this table.
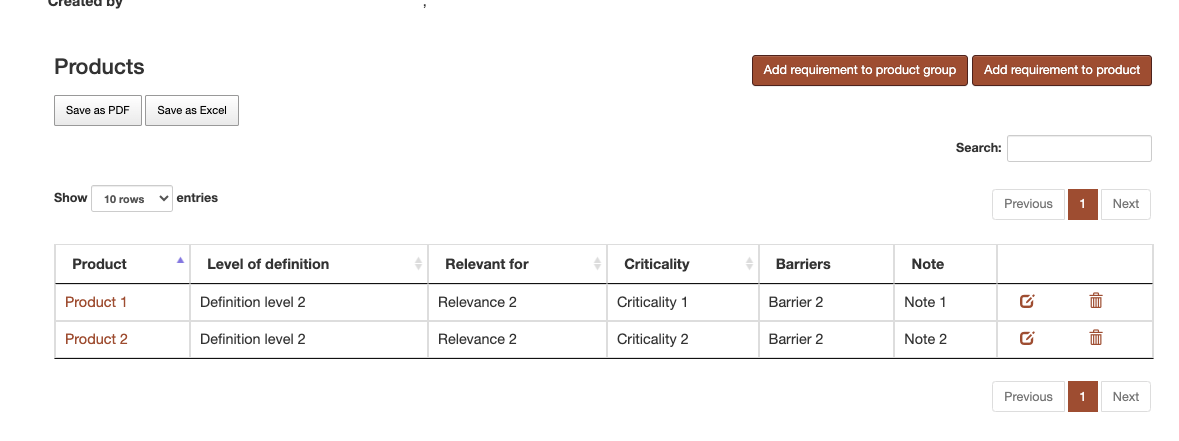
Figure 5 Requirement Products relation table
Those relations must be unique, so between Product A and Requirement B there can be only a relation. There is an exception to this rule in case the Relevance parameter is different. There are two ways to add a new relation to products. First method is to click on the “Add requirement to product” button and then complete a form in which you select the product you want to use in that relation. The second method is to click on the “Add requirement to product group” button. In the form a product group can be selected. After form submission, relations will be created between the requirement and all the products that are in that product group. A relation will be created only if a relation does not exist between that product and that requirement, following the Relevance rule presented above. The relations can also be edited or deleted using the buttons attached to each row in the table.
The second table concerns the relation with data. All data with which the requirement has a relation with is listed in this table.
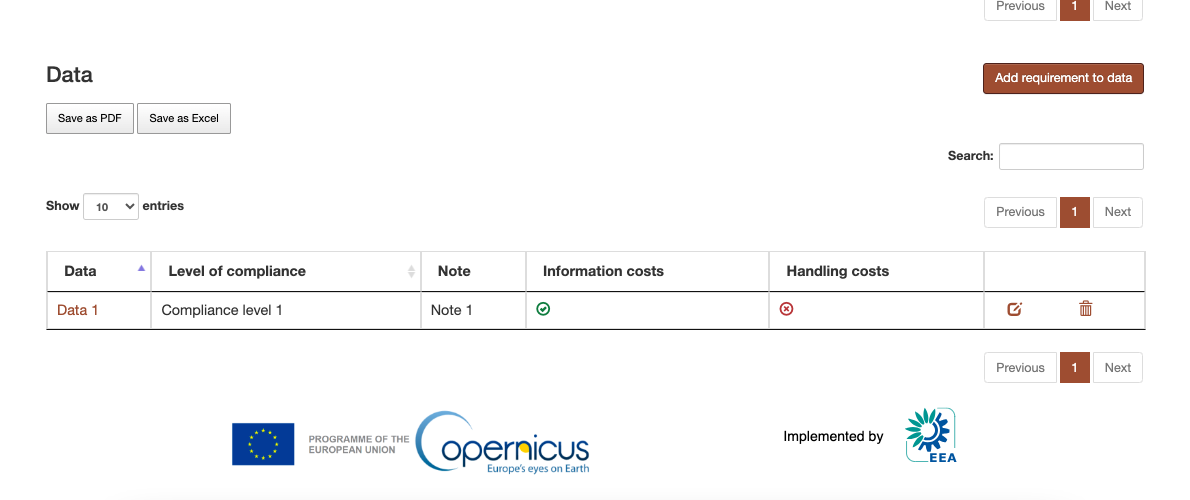
Figure 6 Requirement Data relation table
Similar to the products, new relations between the requirement and data can be created. There must be a unique relation between a requirement and a data. The relation can be edited or deleted using the buttons from the table.
Updating an existing requirement
A requirement can be edited by clicking on the “Edit Requirement” button from a requirement’ s detail page. The form must again respect all validation constraints, including the uniqueness of the requirements discussed in the Creating new requirements section.
Deleting a requirement
A requirement can be deleted by clicking on the “Delete Requirement” button from a requirement’ s detail page. Another button must be clicked then to accept this change.
Data
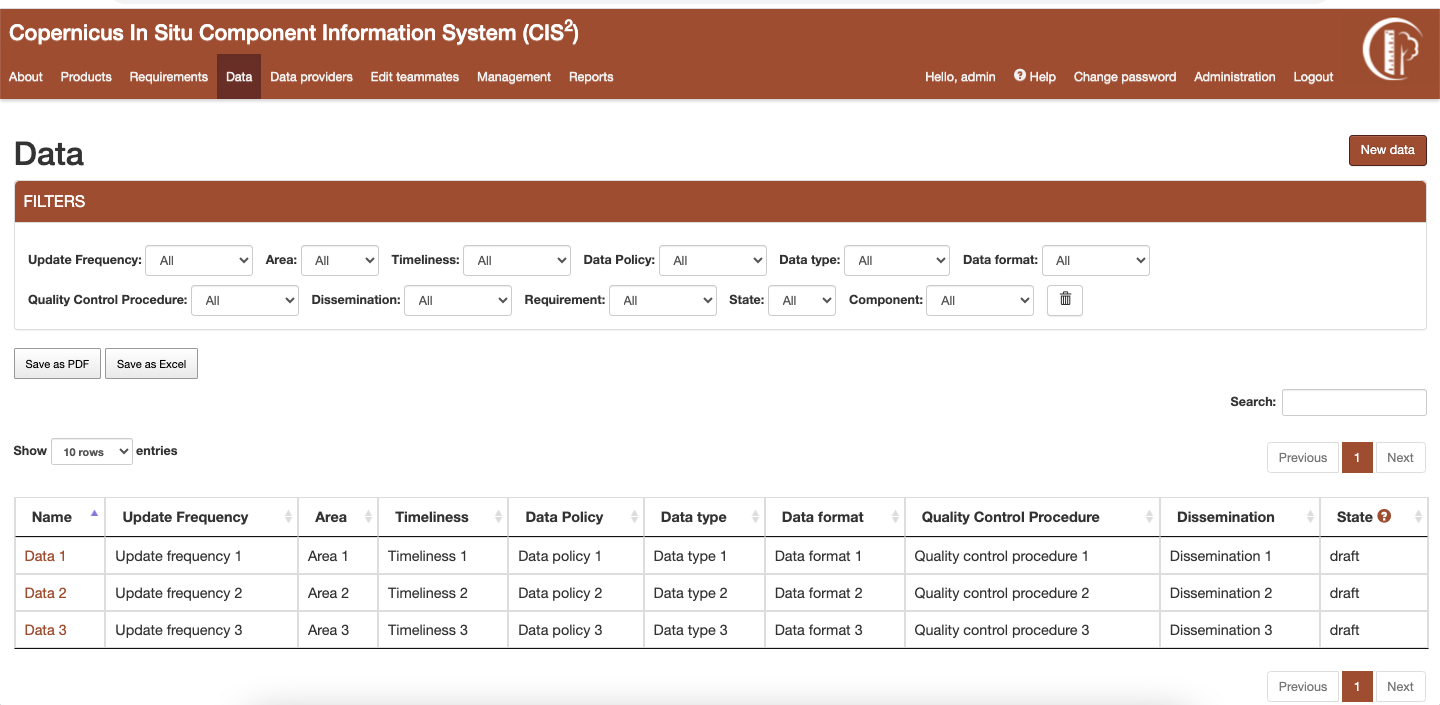
Figure 7 Data Provider listing page
Listing data
Data listing page can be accessed from the link in the navigation bar. The listing can be filtered using the dropdown options or by searching data by its name. The filtered table can be exported then as a PDF or Excel document.
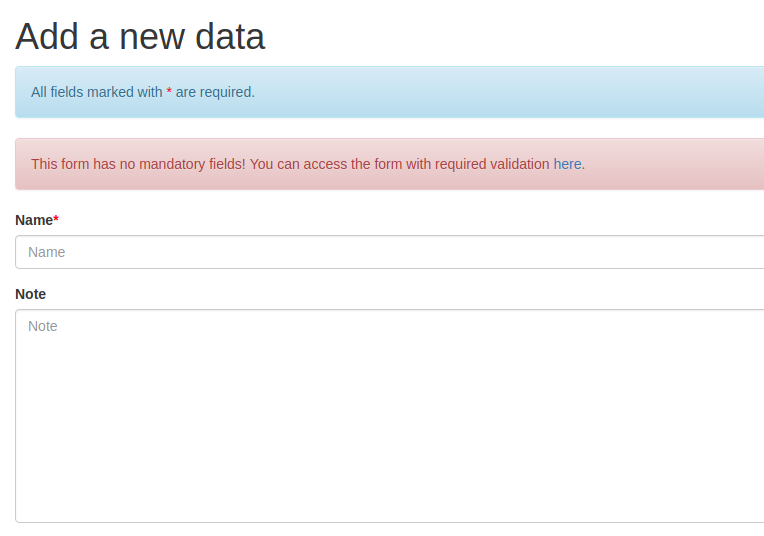
Figure 8 Datalisting page
Creating new data
A new data can be created by clicking the button “New data” from the listing page. The form which is initially accessed has no validation. This was decided in order to allow partial data to be created in the application. However, if the user is sure about the data that he wants to introduce, he should use the form provided in Figure 8. There is a special validation rule for this form: at least an inspire theme or an essential variable.
Cloning a data
The clone option can be used if the new data is very similar to one existing already in the application. The cloning form can be accessed by going to the detail page of the similar data and clicking on the Clone button. The form will be completed with data from the similar data.
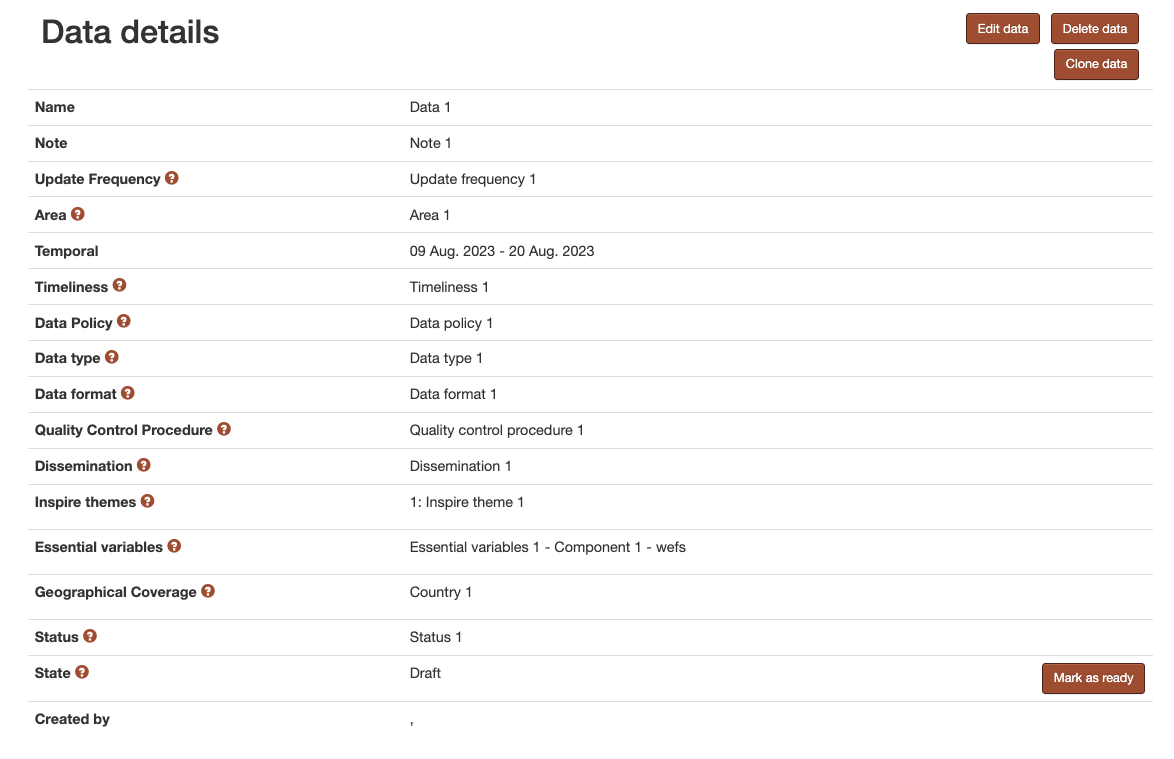
Figure 9 Data detail page
Detail page of data
A data’ s detail page can be accessed by clicking on the data’s name in the listing table. All information concerning the data is displayed on this page. If that data is just partially completed, a warning message will be displayed on the top of the page with a link to the editing page with full validation(Figure 9).
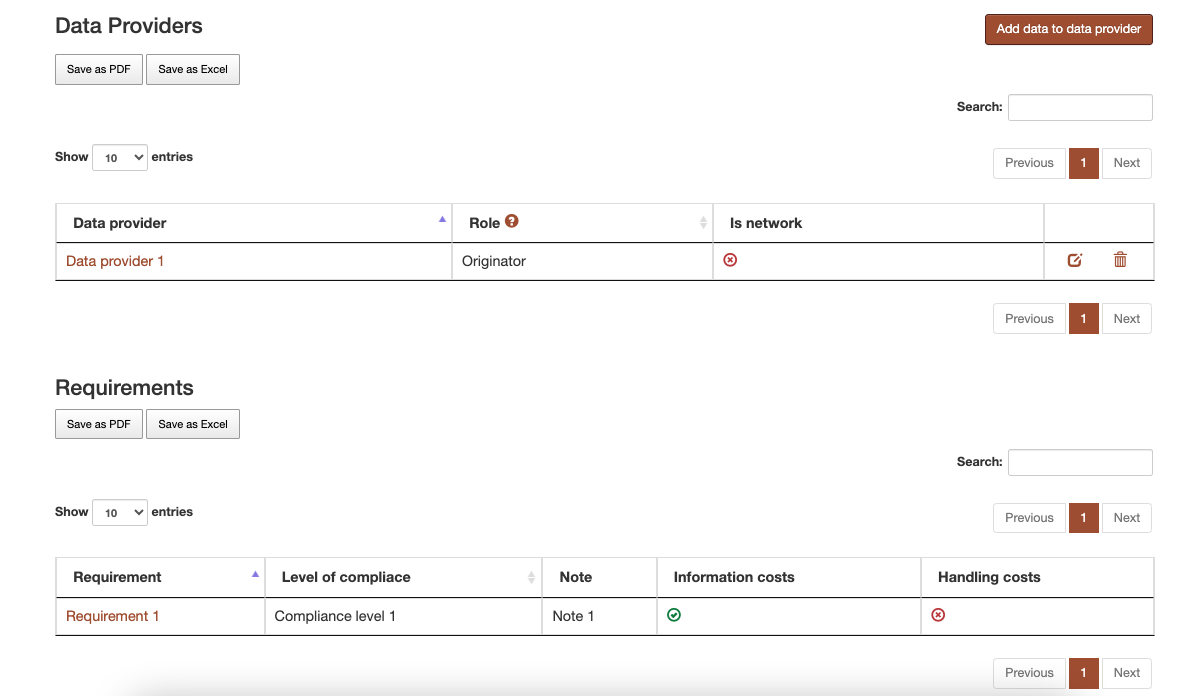
Figure 10 Data detail page relations
There are two tables at the bottom of the page. Both tables can be filtered by name and then exported as PDF or as Excel.
The first table concerns the relation with data provider. All data providers with which the data has a relation with are listed in this table. Those relations must be unique, so between Data A and DataProvider B there can be only one relation. By clicking on the button “Add data to data provider” and completing the form a new relation is added. The relation can be edited or deleted using the buttons from the table.
The second table concerns the relation with requirement. All requirements with which the data has a relation with is listed in this table. New relations can be created from requirement’ s page.
Updating an existing data
A data can be edited by clicking on the “Edit Data” button from a data’ s detail page. Similar to the creation of new data, there are two forms: one with validation and one without.
Deleting data
Data can be deleted by clicking on the “Delete Requirement” button from a requirement’ s detail page. Another button must be clicked then to accept this change.
Data provider
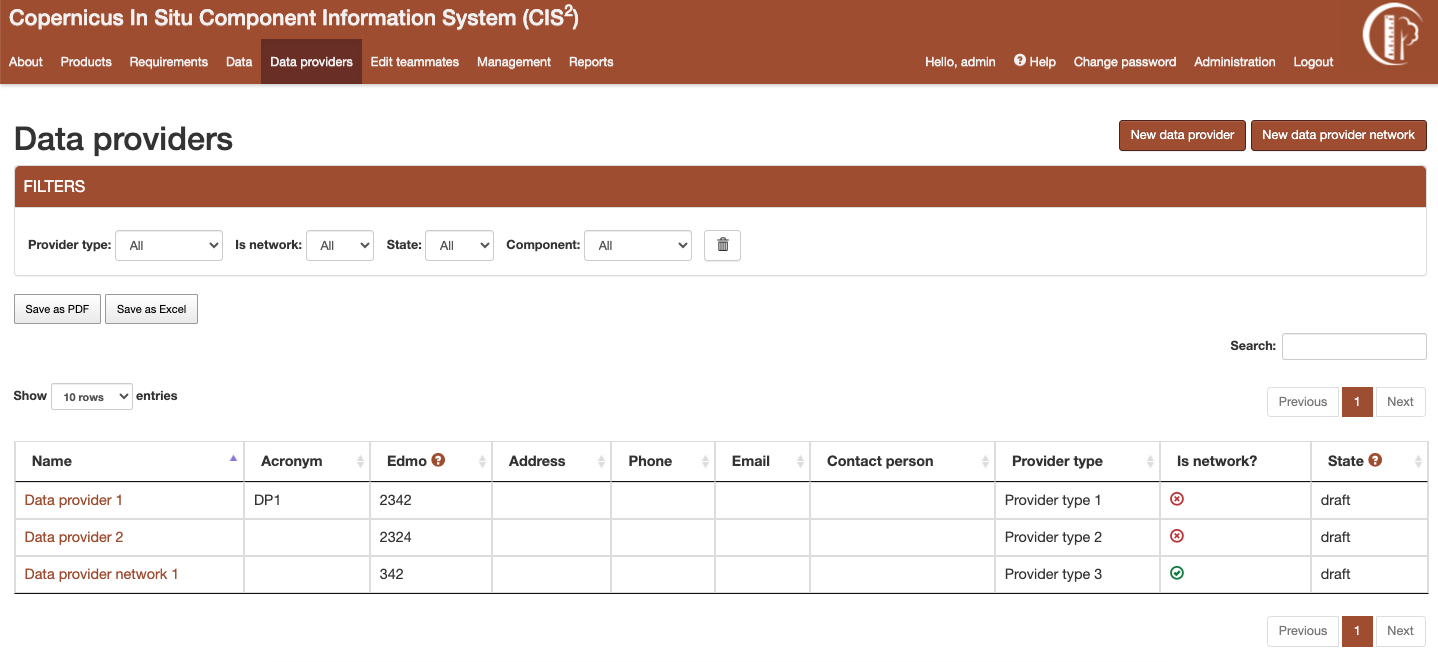
Figure 11 Data provider listing
There are two types of data providers: data provider network and data provider. The data provider network can have other data providers or data provider networks as its members. This structure is defined as so to maintain a hierarchy between data providers.
Listing data provider
Data provider listing page can be accessed from the link in the navigation bar. The listing can be filtered using the dropdown options or by searching data by its name. The filtered table can be exported then as a PDF or Excel document.
Creating a new data provider
A new data provider can be created by clicking the button “New data provider” from the listing page. A new data provider network can be created by clicking the button “New data provider network” from the listing page.
Detail page of data provider
A data provider’s detail page can be accessed by clicking on the data provider’s name in the listing table.
All information concerning the data provider is displayed on this page. There is a tables at the bottom of the page.It can be filtered by name and then exported as PDF or as Excel. The table concerns the relation with data. All data with which the data provider has a relation with is listed in this table.
Updating an existing data provider
A data provider can be edited by clicking on the “Edit Data Provider” button from a data provider’ s detail page. Different forms are used for data provider/data provider network.
Edit network members
A data provider network can have members. Its members can be edited by clicking on the “Edit network members”. A network can’t be its own member.
Deleting data provider
A data provider can be deleted by clicking on the “Delete Data provider” button from a data provider’ s detail page. Another button must be clicked then to accept this change.
Users
User Registration
A new user can be added to the application only by an administrator. The administrator uses the form in Figure 12 to create a new user with the chosen username and email. After creation, the person receives on the given email their login information, including a password set URL.
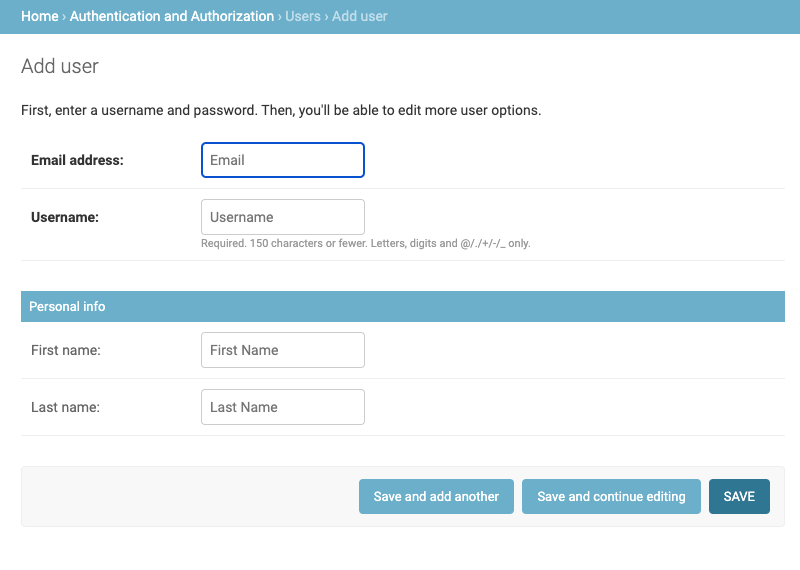
Figure 12 User Registration Form
User Roles
There are multiple types of users in the application:
Administrator
The administrator can modify everything in the application, without restriction. This type of user also has access to an administrative pannel.
Picklists Editor
This user role allows a user to access a filtered version of the administrative pannel, for modifying the picklists. This user is only allowed to add/edit the picklists.
Product Editor
This user role allows a user to add or edit the products, similar to the way requirements, data and data providers are edited.
Regular Users
The user is restricted from accessing the administration section, the management section and create, update or delete any products.
The users have permission to edit or delete an object if they are the owner of it. Being the owner of an object means that the object was created by that specific user.
Read-Only User
The read-only user is a user that is included in the Read-only Group. This type of user can only view the objects and create and download reports, but they cannot add, edit or delete any information in the application.
Unauthenticated User
A guest to the application can view the objects and download the reports, but they cannot add/edit/delete any information from the application.
User Teams
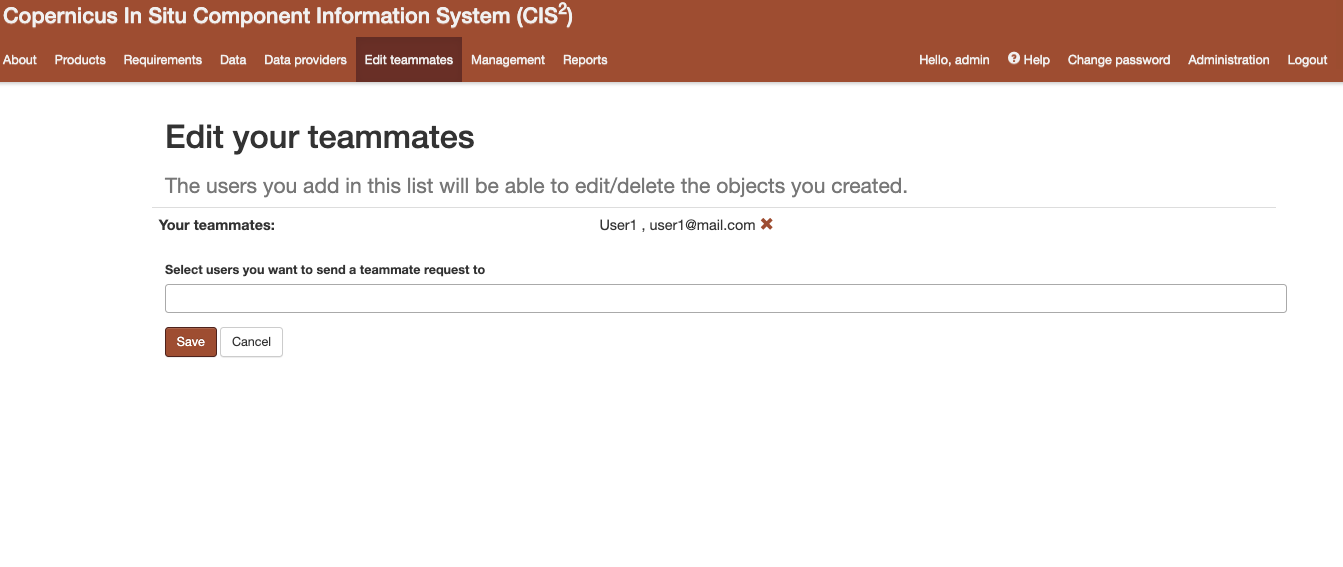
Figure 13 Teammates editing form
A user can add other users to his team. Adding a user to one’s team gives that user permission to edit or delete all objects created by that user. Once a user A adds another user B to his team, the user B will also have user A in their team. A user can edit their teammates by accessing the edit teammates form from the navigation menu. Once a user sends a teammate request, the other user will receive an email containing a link. Only after the link is clicked, the two users will become teammates. (Figure 13)
Change Password Option
In case the account password was forgetten, the user can reset their password. An e-mail will be sent to the user’s email account with a reset password link. The user will then be able to set their new password.
Validation workflow
Requirement, Data and Data Provider are all passing through a validation workflow.
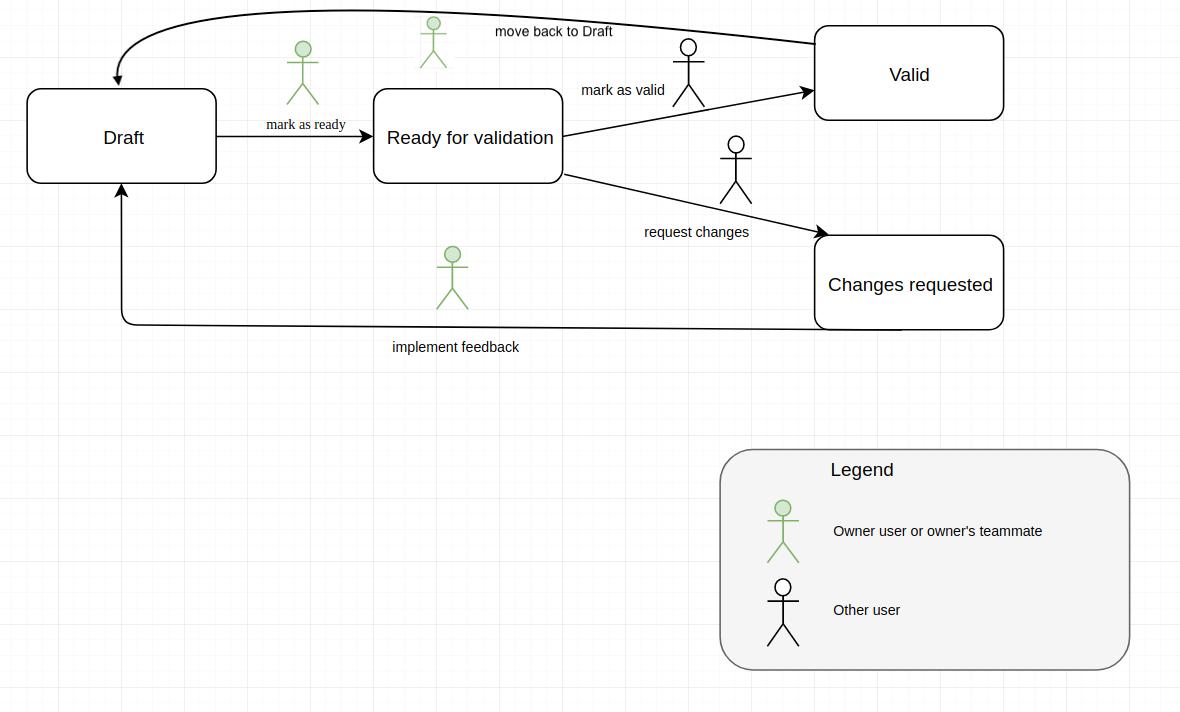
Figure 14 Workflow for Requirement, Data, Data Provider
States
Draft
This is the state that the object has on its creation. In this state the object is editable. The owner or one of their teammates can mark as ready the object.
Ready for validation
In this state the object cannot be edited. A user different from the owner or their teammates can mark as valid the object and end the workflow. All users can request changes if that user considers that there is missing information (including the owner).
Changes requested
In this state the object cannot be edited. The owner or one of their teammates can get the object back to the draft state.
When an object’s state is changed into “changes requested”, the user requesting the changes has to complete a feedback field in which they inform the owner of the object about the changes that should be made (Figure 15). The owner and their teammates receive an e-mail informing them that the object has requests for changes, the user that made those requests and what changes the user requested (from the feedback field). The users in the application can see this feedback when the object is in state “Changes requested” or “Draft” on the detail page of the object (Figure 16) . This feedback can be cleared by the owner or their teammates if the object is an editable state.
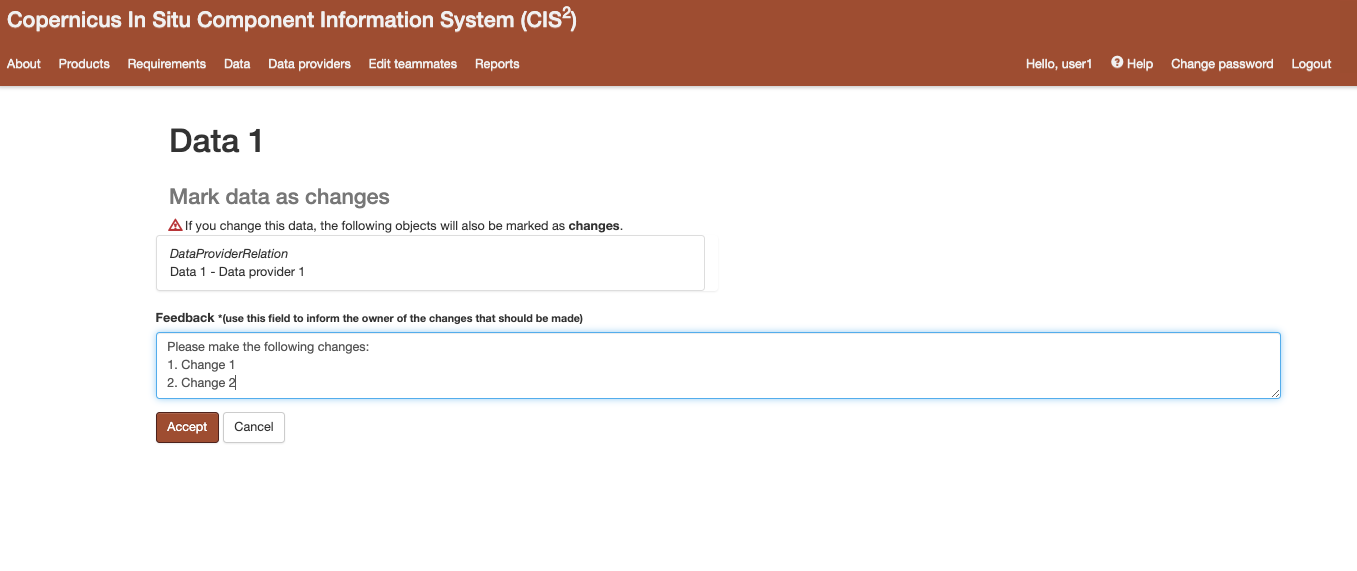
Figure 15 Request changes feedback field example
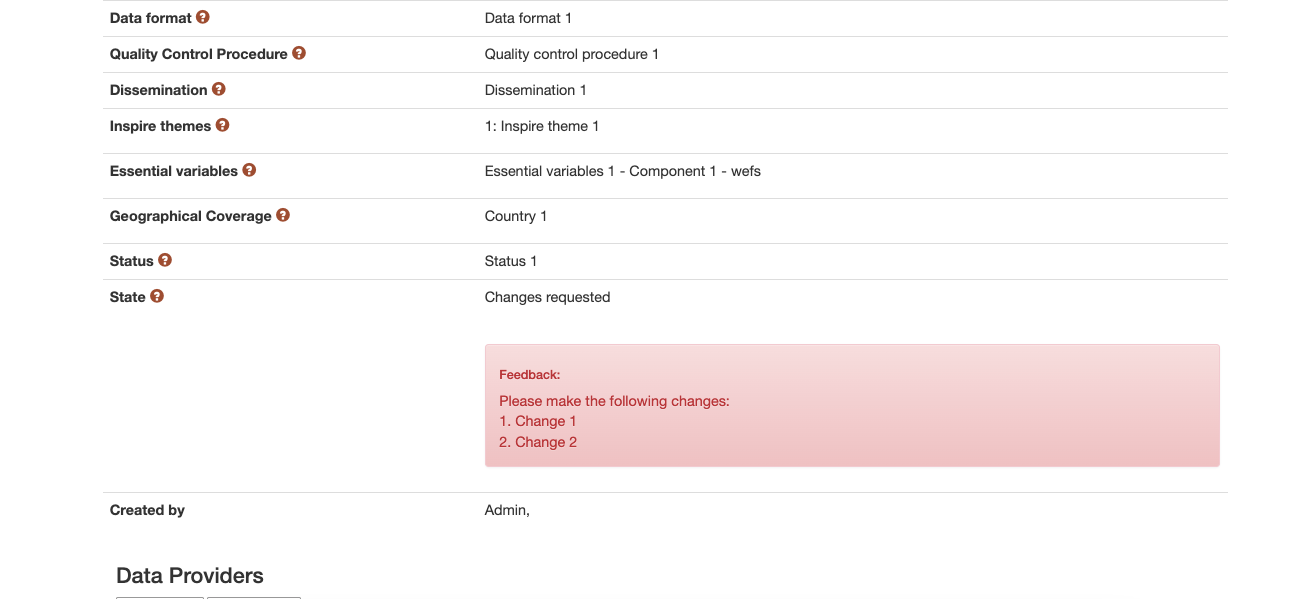
Figure 16 Example of display of a feedback left by a user
Valid
In this state, the workflow has ended and the object cannot be modified anymore. The object can be sent back to “Draft” state if the users agree that more changes should be made to it.
State of the relation objects during validation
The relations between the objects do not go through the validation workflow. As such, relations between entries can be created, edited or deleted no matter the state of the objects they are linking.
Reports
For exporting data in various formats, reports have been added to the application. The reports are generated by database queries. Those queries are established and implemented, so for any new report a request to the developing team must be made. The reports can be accessed by clicking on the “Reports” tab from the navigation menu.
Reports list
The reports’ list can be accessed by clicking on the “Reports” tab from the navigation menu. This page consists from a list with all the reports defined in the application. Each report is defined by a name and contains a short description which describes what the report contains. An example of this page is available in Figure 17 .
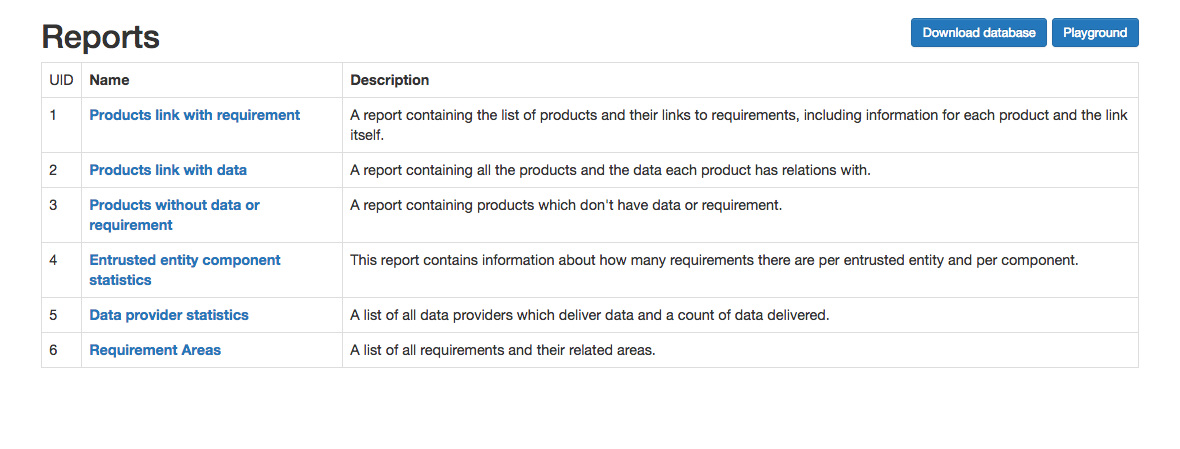
Figure 17 Reports list page
Report detail page
On the report detail page has the name and description on the top part. After those there is a single tab, named “Pivot”.
Pivot
A loading animation will be displayed until the pivot table loads. The available columns are displayed on the top of this table or on the left side, depending on the report.
Those columns can then be dragged under the area surrounded by a blue border in the Figure below. The columns will appear in the preview section in the order they were introduced. They can be rearanged to fit the user’s need. The data displayed in each column is arranged in alphabetical order. The preview shows the user how the exported PDF/Excel file will look like. The pivot table can be exported in HTML, PDF or Excel format. (Figure 18 and Figure 19) .
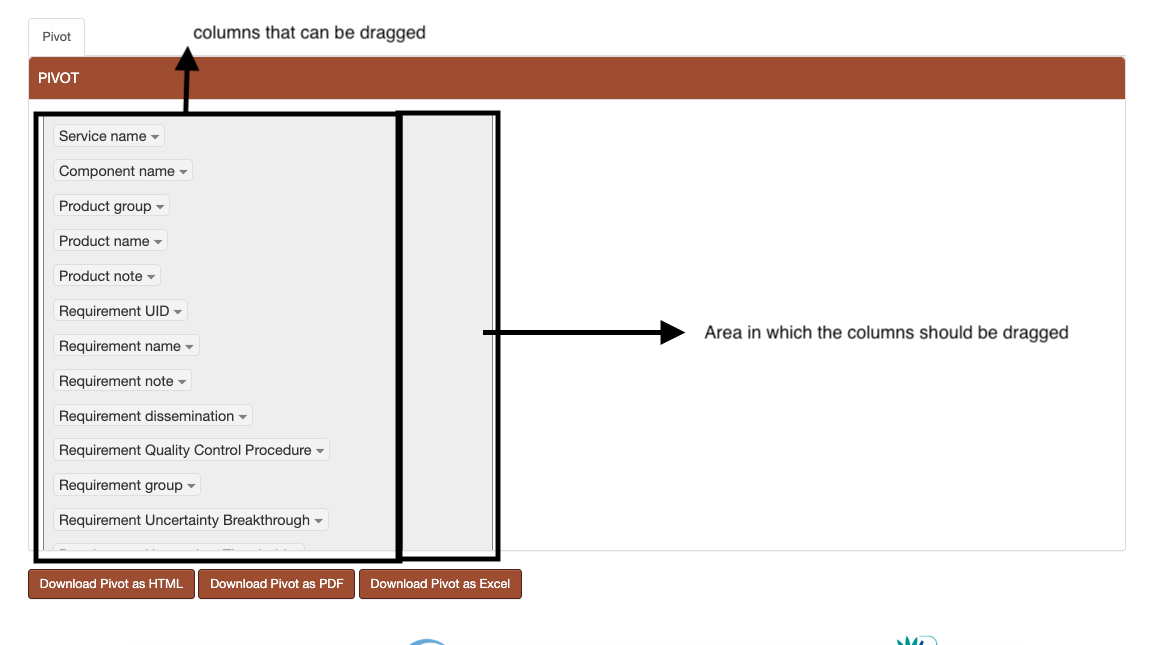
Figure 18 Report pivot - before dragging columns

Figure 19 Report pivot - after dragging columns
Filtering data in Pivot
The data in the table can also filtered by clicking on the arrow next to the column name (Figure 20).

Figure 20 Report pivot - filter the data in the table
Special reports
The special reports are spreadsheet files that have unmerged cells and can be filtered afterwards with specialized tools. Those reports can be found on the Report’s list page, on the top of the page. For each report there is a description explaining what type of data each report contains.
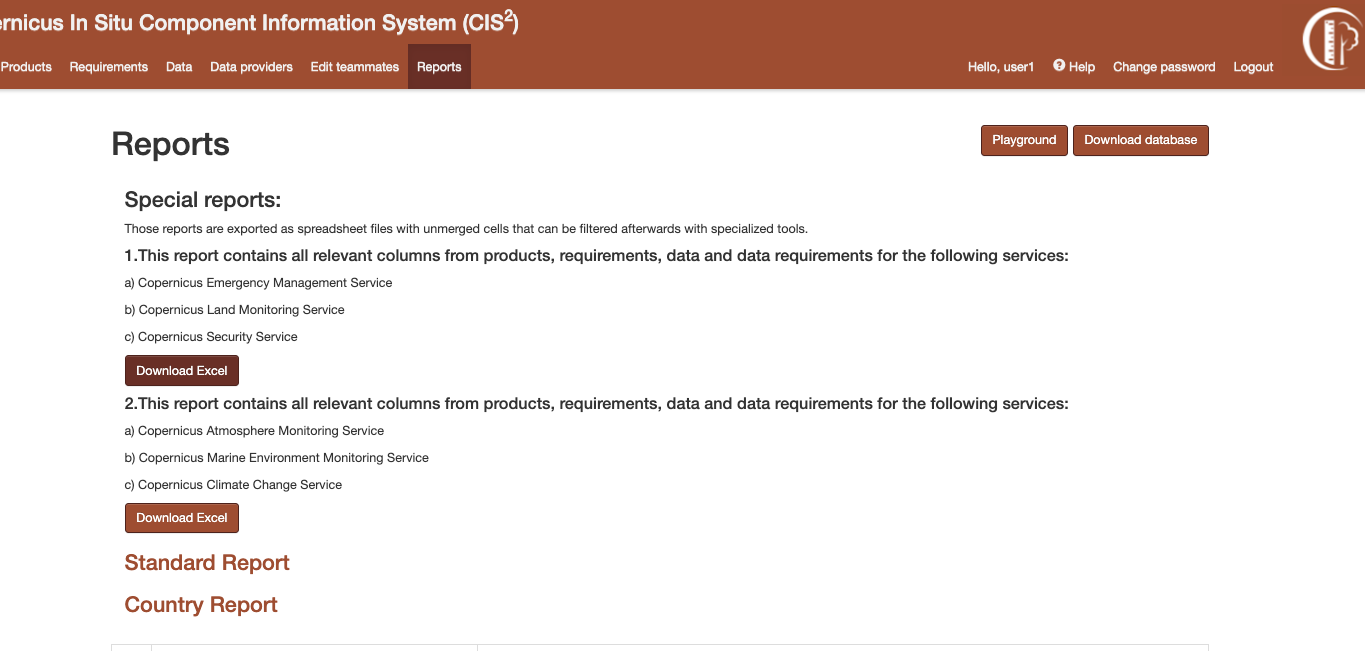
Figure 21 Special reports
Standard Report
The application also generates Standard Reports. Those reports present data that is filtered against the components of the 3 following services: Copernicus Emergency Management Service, Copernicus Land Monitoring Service and Copernicus Securiy Service. One exception is available for the For the Global Land Component as only 2 products are filtered for it ( the Hot Spot Monitoring - Land Cover and Hot Spot Monitoring - Land Cover Change products) .
The Standard Report is available under the Reports tab from the navigation menu followed by clicking on the link “Standard Report”.
The user can then select one or more Components from the second dropdown to filter the data against. The first dropdown, Service, is used to filter the Components in the second dropdown in order to better identify which component is part of which service. (Figure 22) After setting the filters, the user has the option to either generate the Standard Report as a PDF or as an Excel file. The file will contain details regarding the component(s) that the data was filtered against and the date and time at which the report was generated.
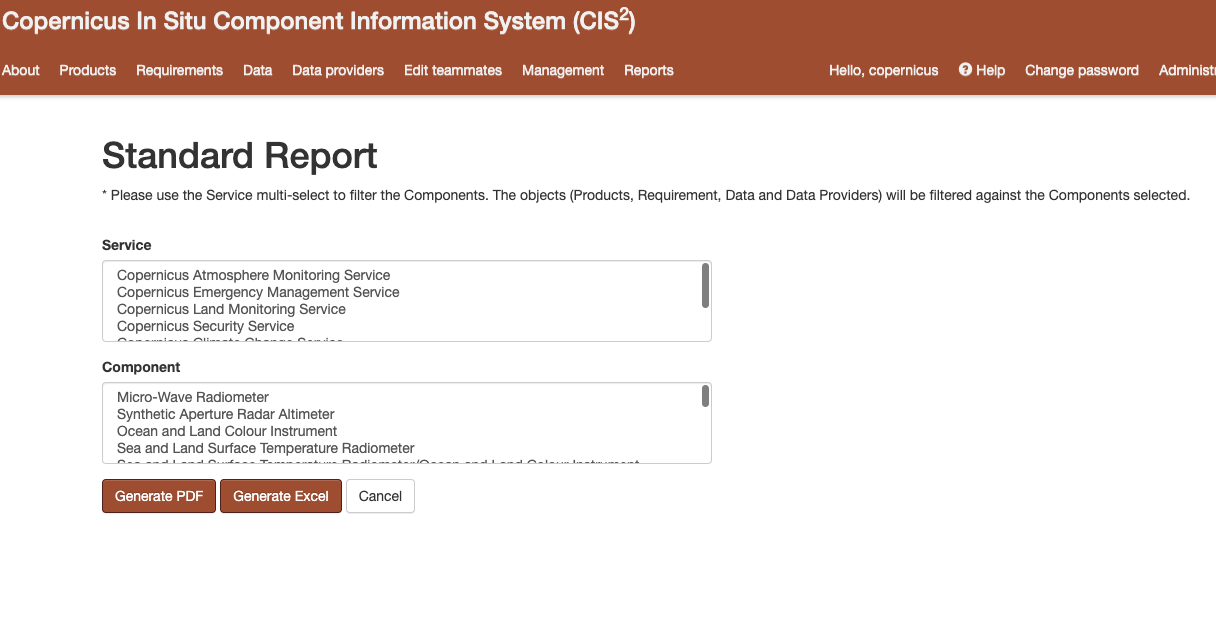
Figure 22 Standard report
Country Report
The application also generates Country Reports. Those reports present data that is filtered against the data providers that are part of the selected country.
The Country Report is available under the Reports tab from the navigation menu followed by clicking on the link “Country Report”.
The user can then select one Country from the dropdown to filter the data against. (Figure 23)
After selecting the country, the user has the option to either generate the Country Report as a PDF or as an Excel file.
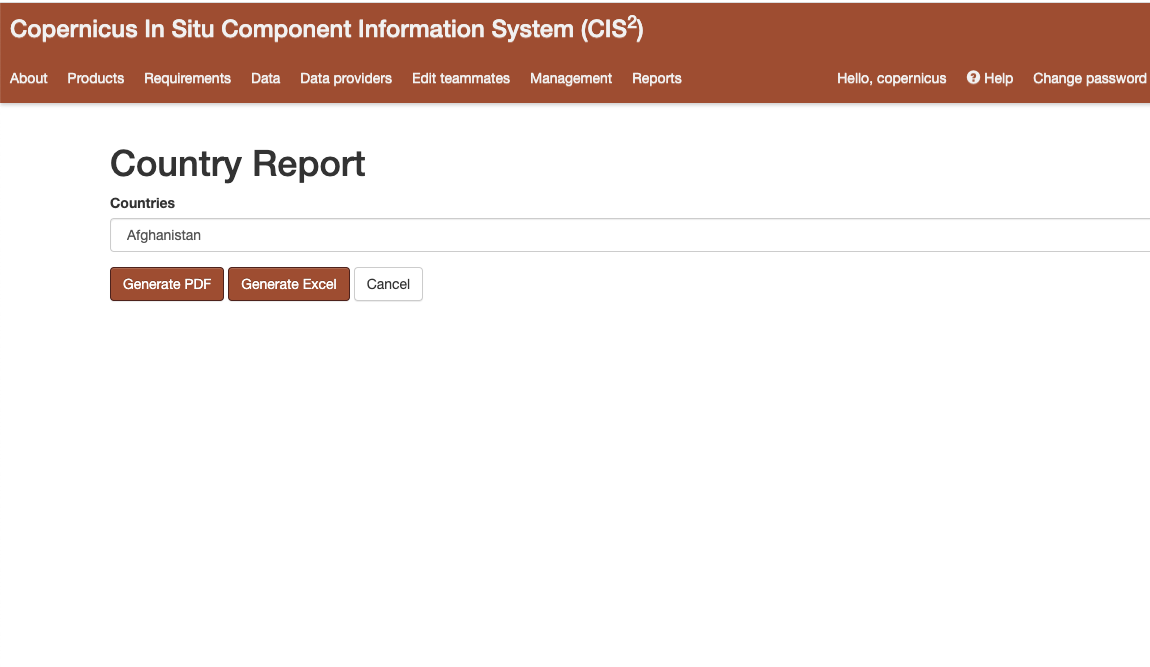
Figure 23 Country report
Administration
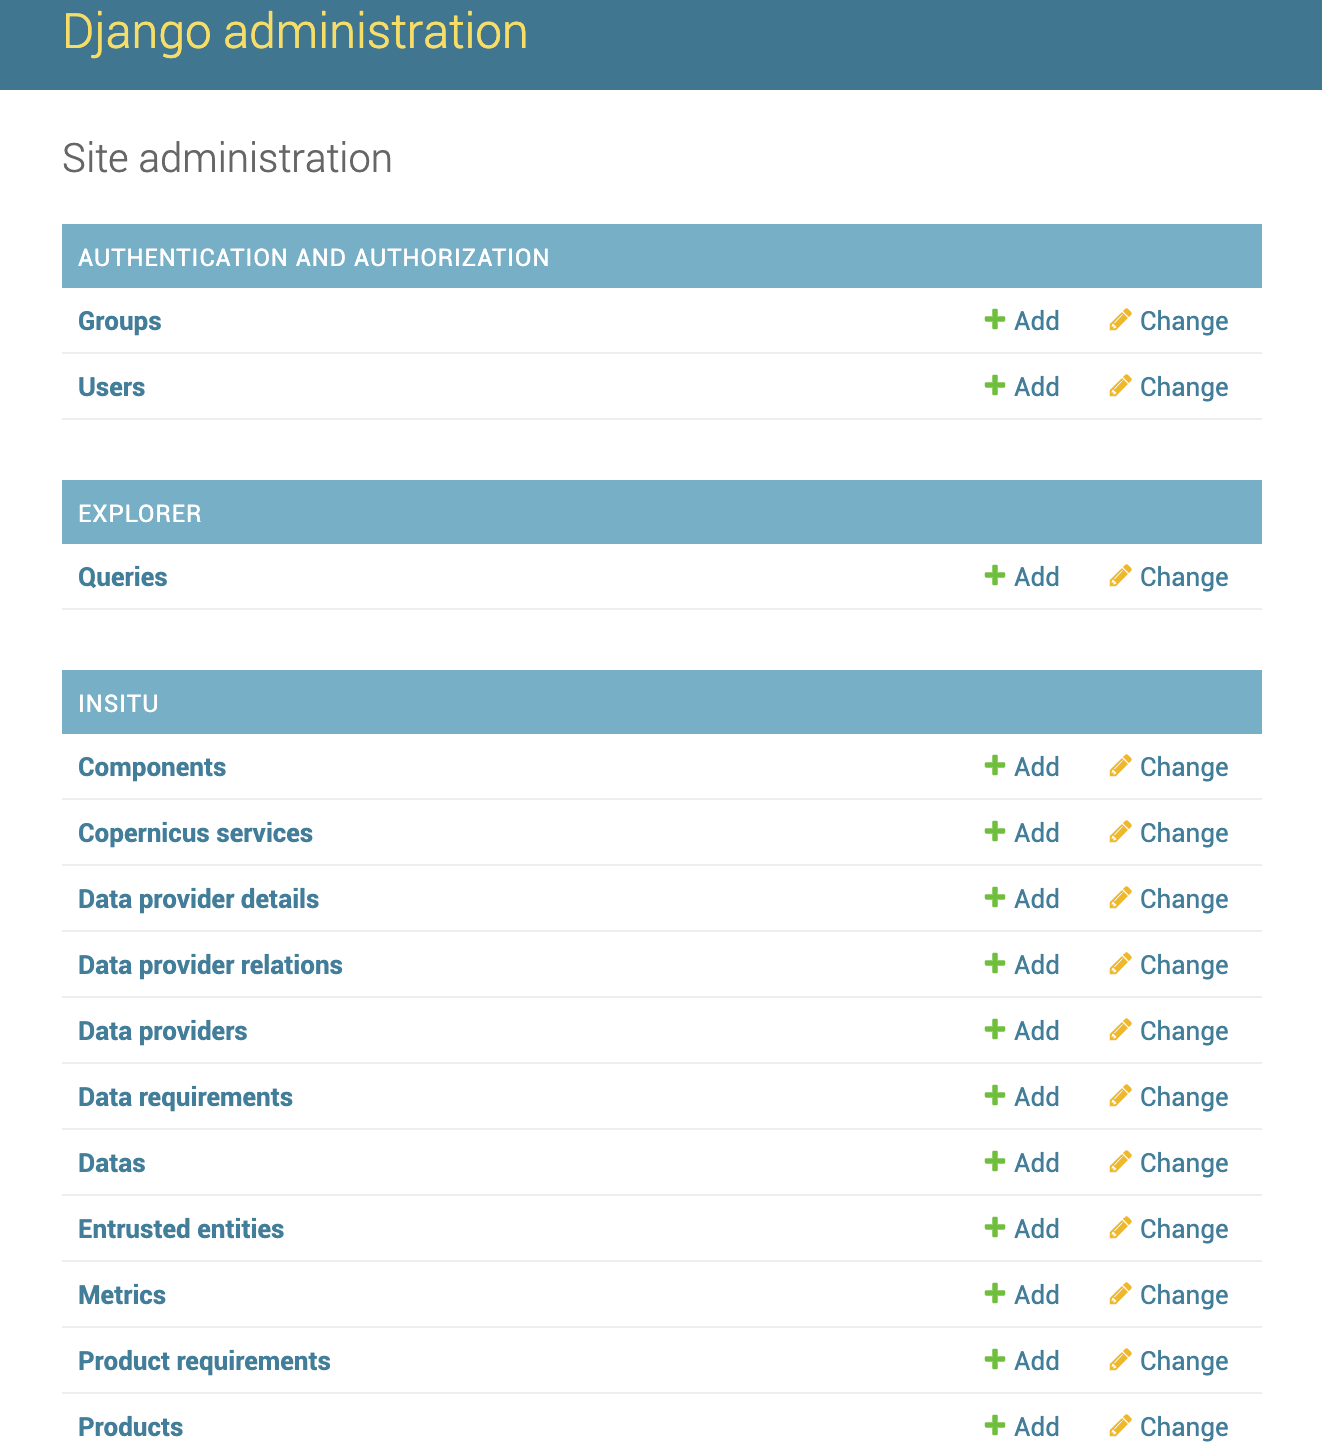
Figure 24 Administrator panel
The administration panel can be accessed only by a user who has administration rights. Here, all objects, relations and picklists values can be modified without countraints.
Help page
The help page describes each value in the dropdowns used to fill the objects. The help page can be accessed from the navigation menu by clicking “Help”. In the forms, the dropdown fields have attached a question mark. By clicking on that question mark you will access the help page.
Figure 25 An example table from help page
For Example, in Figure 25 is one of the tables available on the Help page. Under the table title there is a small description of that field’ s purpose. In the table there is the name of each value and the description of what that value represents.
Management
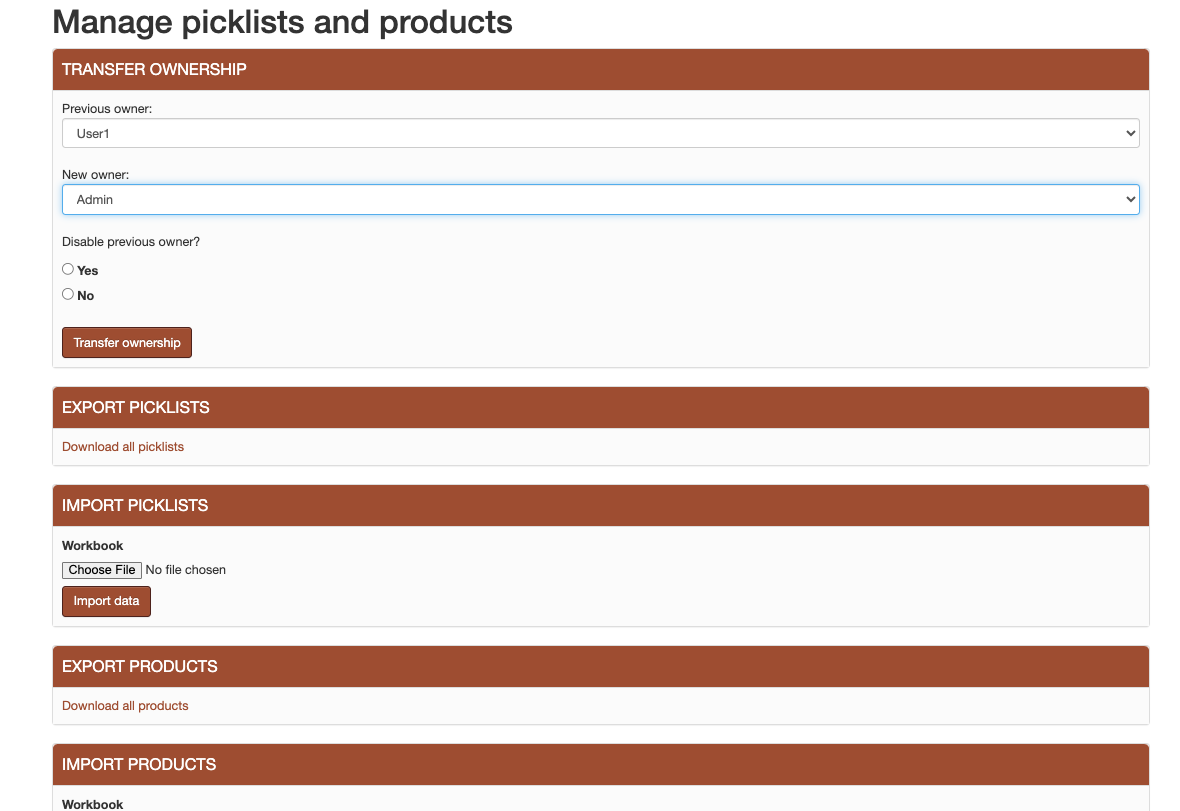
Figure 26 Management section
The management section is accessible only to an user with administration rights. This section can be used to export all picklists or all products as an excel document. In order to import picklists or products, the user must first export them, edit the exported spreadsheet and then import it.
Statistics about the data can also be extracted on this page. The user can check, for a selectable period of time, how many objects were active, how many objects were created and how many objects were updated. The user has to select a start date for the period, an end date and the objects type they want the data to be shown for.
Ownership Transfer
When people are no longer working on the application data, their objects ownership needs to be transfered to a new active user. This can be easily done using a management feature. Using the form in Figure 27, an administrator should choose the previous user and the new user. All the objects, including the links between objects will be transfered to the new user. There is also an option to disable the previous user’s account.
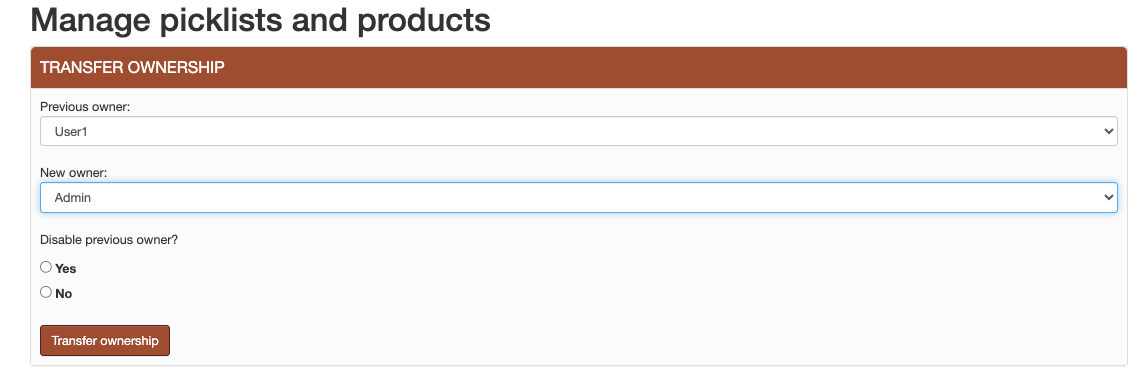
Figure 27 Transfer ownership
Logging actions
All editing actions done by users are logged in Admin. That includes: editing, adding or deleting any object from the application will be stored. The log gives informations about the user, the action the user made and the object that was accessed. Figure 28
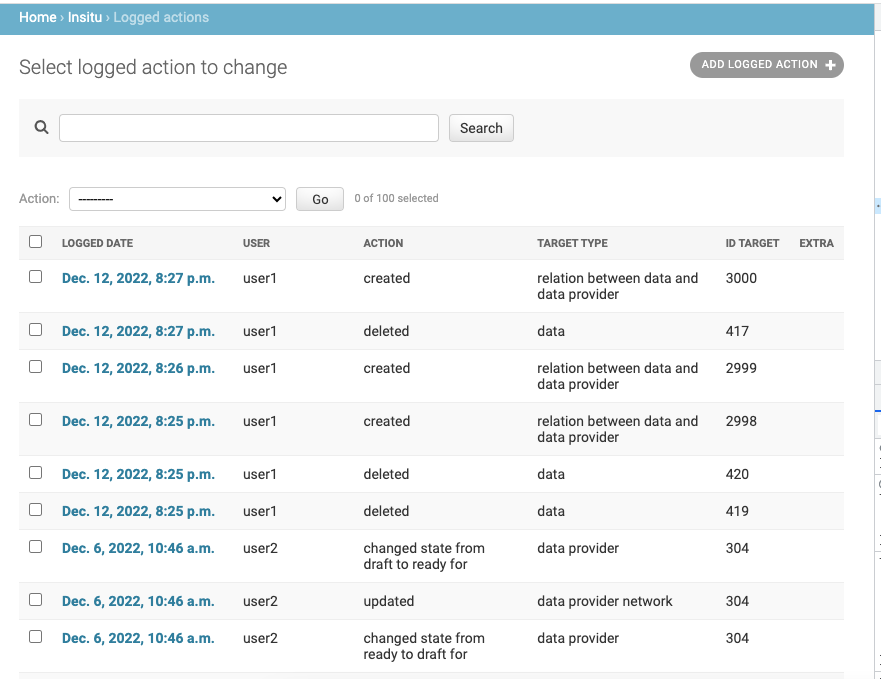
Figure 28 Loggging management
Releases
The application is released in versions. Each version has a month and year combination and a short description of the changes made during the last version. The releases can be visualised under the “Releases” tab from the About page.
Figure 29 Releases
Soft deletion
The objects and relations are never deleted. They are instead marked as “deleted”. The objects can be permanently deleted only by accessing the database directly.